DIY Tulle Wreath
Pretty, Pretty Tulle
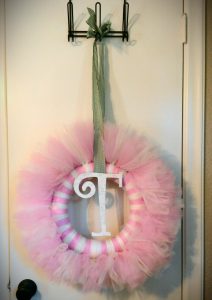
In the spirit of pretty girly things, I will now share with you my pretty, pretty tulle wreath.
Ta Da! All you need is Supplies and Time!

I got inspired by a picture I saw from a super cute ballerina party so, naturally, I went to Pinterest where I happily discovered a lovely tutorial. I did not take her advice and use an 8-inch wreath form. Mostly, because when I went there wasn’t one at Hobby Lobby (mine was 12 inches). I also used just under 120 yards of pink and 75 yards of white, alternating double layers of six, then three knots.
When the basic wreath was complete, I added a ribbon and Mod Podged some girly paper onto a letter (but, you know, that wasn’t good enough because some Tim Holtz paint was on sale and I had to have a reason to try it…). So, I put a layer of the Distress Crackle Paint in Picket Fence – a.k.a. White. It wasn’t quite what I wanted. To get a good crackle it has to be a thick-ish layer. When it is that thick it wasn’t opaque, which was more what I was going for. To tone it down I just sanded the heck out of it. And, voila, Tulle wreath with a letter.
Just another reason, it is a good thing all my girls have four legs. Ain’t nobody got time for all this! But, I have committed to a garden party for little T! Mwahahahahaha!
And, if you want to see how that garden party turned out check out the pics at Andrea Lynn Events!


